
前言
在学习了Spring4+SpringMVC+mybatis整合以及ssm简单使用后,我们已经基本掌握ssm开发的基础知识,下面将进行ssm高级注解开发,包括的知识有:包装类型pojo参数绑定(即类中不是简单类型的属性,而是另外的pojo),list参数绑定,数据回显,上传图片,json交互,RESTful架构,拦截器等
此次开发是基于上面两篇文章中的项目实现的,上面两篇文章的项目源码请到我的github项目下载
添加按商品名称查询功能
我们已经在mapper包下的ItemsCustomMapper中定义了根据名称来查询的sql片段,
接下来,我们需要在controller类中的queryItems方法绑定ItemsQueryVo对象(即包装类型pojo对象)
原来的queryItems方法1
2
3@RequestMapping("/queryItems")
public ModelAndView queryItems() throws Exception{
List<ItemCustom> itemsList=itemsService.findItemsList(null);
改为1
2
3
4@RequestMapping("/queryItems")
public ModelAndView queryItems(ItemsQueryVo itemsQueryVo) throws Exception{
//形参上传入了ItemsQueryVo对象,并将形参传入service的findItemsList方法中
List<ItemCustom> itemsList=itemsService.findItemsList(itemsQueryVo);
在itemsList.jsp页面中对应添加商品名称的查询条件(input输入框)
将body中form表单部分改为1
2
3
4
5
6
7
8
9
10
11
12
13<form class="layui-form" action="${pageContext.request.contextPath}/items/queryItems.action" method="post">
<label class="layui-form-label">查询条件</label>
<div class="layui-input-block">
<label class="layui-form-label">商品名称</label>
<div class="layui-input-inline">
<%-- 注意:这里传入的是ItemsQueryVo类下的pojo类ItemCustom下的name属性 --%>
<input class="layui-input" type="text" name="itemCustom.name">
</div>
<div class="layui-input-inline">
<button class="layui-btn" type="submit" value="查询">查询</button>
</div>
</div>
</form>
这里只是取ItemsQueryVo类下的ItemCustom的name属性,若有多层包装类,则按照类名.类名.(...).属性来命名form表单所要传入参数
然后,只要在商品显示页面的商品名称输入框输入所要查找的商品名称,就可以看到相应结果
新增添加商品信息功能
在mapper包下的ItemsMapper.xml下已经编写好往数据库插入记录的insert语句,
由于我这里使用的是sqlserver的id自增类型,不允许再插入id值,需要修改一下
insert语句(使用mysql的自增类型则不用修改),如下:1
2
3
4
5
6
7
8
9
10
11
12
13
14
15
16
17
18
19
20
21
22
23
24
25
26
27
28
29
30
31
32
33
34
35
36
37
38
39
40
41
42
43
44
45
46
47
48
49
50
51
52
53
54
55
56
57
58
59
60
61
62
63
64
65
66
67
68
69
70
71
72
73
74
75
76
77
78
79
80
81
82
83
84
85
86
87
88
89
90
91
92
93
94
95
96
97
98
99
100
101
102
103
104
105
106
<!--<insert id="insert" parameterType="po.Items">-->
  <!--insert into items (id, name, price, -->
    <!--detail, pic, createtime-->
    <!--)-->
  <!--values (#{id,jdbcType=INTEGER}, #{name,jdbcType=VARCHAR}, #{price,jdbcType=NUMERIC}, -->
    <!--#{detail,jdbcType=VARCHAR}, #{pic,jdbcType=VARCHAR}, #{createtime,jdbcType=TIMESTAMP}-->
    <!--)-->
<!--</insert>-->
<!--<insert id="insertSelective" parameterType="po.Items">-->
  <!--insert into items-->
  <!--<trim prefix="(" suffix=")" suffixOverrides=",">-->
    <!--<if test="id != null">-->
      <!--id,-->
    <!--</if>-->
    <!--<if test="name != null">-->
      <!--name,-->
    <!--</if>-->
    <!--<if test="price != null">-->
      <!--price,-->
    <!--</if>-->
    <!--<if test="detail != null">-->
      <!--detail,-->
    <!--</if>-->
    <!--<if test="pic != null">-->
      <!--pic,-->
    <!--</if>-->
    <!--<if test="createtime != null">-->
      <!--createtime,-->
    <!--</if>-->
  <!--</trim>-->
  <!--<trim prefix="values (" suffix=")" suffixOverrides=",">-->
    <!--<if test="id != null">-->
      <!--#{id,jdbcType=INTEGER},-->
    <!--</if>-->
    <!--<if test="name != null">-->
      <!--#{name,jdbcType=VARCHAR},-->
    <!--</if>-->
    <!--<if test="price != null">-->
      <!--#{price,jdbcType=NUMERIC},-->
    <!--</if>-->
    <!--<if test="detail != null">-->
      <!--#{detail,jdbcType=VARCHAR},-->
    <!--</if>-->
    <!--<if test="pic != null">-->
      <!--#{pic,jdbcType=VARCHAR},-->
    <!--</if>-->
    <!--<if test="createtime != null">-->
      <!--#{createtime,jdbcType=TIMESTAMP},-->
    <!--</if>-->
  <!--</trim>-->
<!--</insert>-->

<!-- 因为id在sqlserver设置为自增型的id,不需要再插入,这里改写一下insert的sql语句,将上面一段注释掉 -->
<!-- 即在insert中不插入id值 -->
<insert id="insert" parameterType="po.Items">
  insert into items (name, price,
  detail, pic, createtime
  )
  values (#{name,jdbcType=VARCHAR}, #{price,jdbcType=NUMERIC},
  #{detail,jdbcType=VARCHAR}, #{pic,jdbcType=VARCHAR}, #{createtime,jdbcType=TIMESTAMP}
  )
</insert>
<insert id="insertSelective" parameterType="po.Items">
  insert into items
  <trim prefix="(" suffix=")" suffixOverrides=",">
    <if test="id != null">
      id,
    </if>
    <if test="name != null">
      name,
    </if>
    <if test="price != null">
      price,
    </if>
    <if test="detail != null">
      detail,
    </if>
    <if test="pic != null">
      pic,
    </if>
    <if test="createtime != null">
      createtime,
    </if>
  </trim>
  <trim prefix="values (" suffix=")" suffixOverrides=",">
    <if test="id != null">
      #{id,jdbcType=INTEGER},
    </if>
    <if test="name != null">
      #{name,jdbcType=VARCHAR},
    </if>
    <if test="price != null">
      #{price,jdbcType=NUMERIC},
    </if>
    <if test="detail != null">
      #{detail,jdbcType=VARCHAR},
    </if>
    <if test="pic != null">
      #{pic,jdbcType=VARCHAR},
    </if>
    <if test="createtime != null">
      #{createtime,jdbcType=TIMESTAMP},
    </if>
  </trim>
</insert>
修改完成后,在service包下的ItemsService新增addItems方法1
2//添加商品
public void addItems(ItemCustom itemCustom) throws Exception;
在service/impl包下的ItemsServiceImpl重写addItems方法1
2
3
4
5
6@Override
public void addItems(ItemCustom itemCustom) throws Exception{
// 添加商品
//使用itemsMapper中的insert方法来插入记录
itemsMapper.insert(itemCustom);
}
在controller包下的ItemsController设置相应的跳转路径1
2
3
4
5
6
7
8
9
10
11
12
13
14//跳转到添加商品的jsp页面
@RequestMapping("/addItems")
public String add() throws Exception{
return "addItems";
}
// 提交添加商品请求
@RequestMapping("/addItemsSubmit")
public String addSuccess(ItemCustom itemCustom) throws Exception{
//编写添加商品的功能
itemsService.addItems(itemCustom);
return "forward:addItems.action";
}
在controller中指定了addItems.jsp页面,路径是WEB-INF/jsp/addItems.jsp1
2
3
4
5
6
7
8
9
10
11
12
13
14
15
16
17
18
19
20
21
22
23
24
25
26
27
28
29
30
31
32
33
34
35
36
37
38
39
40
41
42
43
44
45
46
47
48
49
50
51
52
53
54
55
56
57
58
59
60
61
62
63
64
65
66
67
68
69
70
71
72<%--
Created by IntelliJ IDEA.
User: 光玉
Date: 2018/4/10
Time: 20:39
To change this template use File | Settings | File Templates.
--%>
<%@ page contentType="text/html;charset=UTF-8" language="java" pageEncoding="utf-8" %>
<html>
<head>
<title>添加商品</title>
<script type="text/javascript" src="<%= request.getContextPath()%>/plugin/layui/layui.all.js"></script>
<link rel="stylesheet" href="<%= request.getContextPath()%>/plugin/layui/css/layui.css">
</head>
<!-- 由于在前端itemsList.jsp使用弹出层将表单传入,
提交按钮也绑定到弹出层的“添加”按钮,这里便不编写“提交”按钮 -->
<body style="background-color: #7e6c75">
<form id="formSubmit" class="layui-form" action="${pageContext.request.contextPath}/items/addItemsSubmit.action" method="post">
<div class="layui-form-item">
<label class="layui-form-label">商品名称</label>
<div class="layui-input-block">
<input class="layui-input" type="text" name="name" placeholder="必须填写此字段"/>
</div>
</div>
<div class="layui-form-item">
<label class="layui-form-label">商品价格</label>
<div class="layui-input-block">
<input class="layui-input" type="text" name="price" placeholder="必须填写此字段"/>
</div>
</div>
<%--<div class="layui-form-item">
<label class="layui-form-label">商品图片</label>
<div class="layui-input-inline">
<input class="layui-input" type="text" name="pic"/>
</div>
</div>--%>
<div class="layui-form-item">
<label class="layui-form-label">生产日期</label>
<div class="layui-input-block">
<input class="layui-input" type="text" name="createtime" placeholder="必填,格式为yyyy-MM-dd HH:mm:ss"/>
</div>
</div>
<div class="layui-form-item layui-form-text">
<label class="layui-form-label">商品详情</label>
<div class="layui-input-block">
<textarea class="layui-textarea" name="detail"></textarea>
</div>
</div>
<%--<div class="layui-form-item">--%>
<%--<div class="layui-input-block">--%>
<%--<button class="layui-btn" type="submit">提交</button>--%>
<%--<button type="reset" class="layui-btn layui-btn-primary">重置</button>--%>
<%--</div>--%>
<%--</div>--%>
</form>
<script>
layui.use('form', function () {
var form = layui.form;
form.render();
});
</script>
</body>
</html>
由于下面还要编写批量删除和批量修改功能,所以显示页面itemsList.jsp在编写完批量删除功能后再给出修改后的代码
新增批量删除功能
同样的道理,需要编写ItemsService,ItemsServiceImpl和ItemsController
ItemsService下添加如下代码:1
2//删除商品
public void deleteItemsById(Integer id) throws Exception;
ItemsServiceImpl下添加如下代码:1
2
3
4
5
6@Override
public void deleteItemsById(Integer id) throws Exception{
// 删除商品
//使用itemsMapper中的deleteByPrimaryKey方法来删除商品
itemsMapper.deleteByPrimaryKey(id);
}
ItemsController下添加如下代码:1
2
3
4
5
6
7
8
9
10
11// 批量删除商品
@RequestMapping("/deleteItems")
public String deleteItems(Integer[] item_id) throws Exception{
// 传入参数类型为商品的id数组
// 根据id批量删除商品
for(int i=0;i<item_id.length;i++){
itemsService.deleteItemsById(item_id[i]);
}
// 完成删除操作后重定向回显示页面
return "forward:queryItems.action";
}
注意:这里传入的是Integer类型的数组,即绑定数组类型
其实和简单类型一样,这里没有用@RequestParam,所以形参名称必须和
前端jsp传过来的参数名称一样(这里是checkbox复选框的name属性)
新增批量修改功能
我们要对数据进行批量修改操作时,通常要用到List集合来存储相关信息
比如我们要获取批量修改过的商品信息,这时就需要绑定List集合参数来实现
注意:不能直接在形参中定义List,要在包装类中声明List
在ItemQueryVo中声明List集合1
2
3
4
5
6
7
8
9
10//批量修改商品的列表
private List<ItemCustom> itemsList;
public List<ItemCustom> getItemsList() {
return itemsList;
}
public void setItemsList(List<ItemCustom> itemsList) {
this.itemsList = itemsList;
}
ItemsController添加如下两个方法1
2
3
4
5
6
7
8
9
10
11
12
13
14
15
16
17
18
19
20
21
22
23
24
25
26
27
28
29
30// 跳转到批量修改商品页面
@RequestMapping("/editQueryItems")
public ModelAndView editQueryItems(ItemsQueryVo itemsQueryVo) throws Exception{
List<ItemCustom> itemsList=itemsService.findItemsList(itemsQueryVo);
ModelAndView modelAndView=new ModelAndView(); //创建视图对象
modelAndView.addObject("itemsList",itemsList);
modelAndView.setViewName("editQueryItems"); //指定用户访问的jsp页面地址,前缀和后缀已在前端控制器中配好
return modelAndView;
}
//批量修改提交后
@RequestMapping("/editQueryItemsSubmit")
public String editQueryItemsSubmit(ItemsQueryVo itemsQueryVo) throws Exception{
// 获取装有客户表的信息
List<ItemCustom> editItemsList=itemsQueryVo.getItemsList();
Integer editId;
ItemCustom editItem;
// 更新信息
// 根据前端传过来的id修改相应内容
for(int i=0;i<editItemsList.size();i++){
editId=editItemsList.get(i).getId();
editItem=editItemsList.get(i);
itemsService.updateItems(editId,editItem);
}
return "forward:queryItems.action";
}
此时商品查询页面ItemsList.jsp的代码为:1
2
3
4
5
6
7
8
9
10
11
12
13
14
15
16
17
18
19
20
21
22
23
24
25
26
27
28
29
30
31
32
33
34
35
36
37
38
39
40
41
42
43
44
45
46
47
48
49
50
51
52
53
54
55
56
57
58
59
60
61
62
63
64
65
66
67
68
69
70
71
72
73
74
75
76
77
78
79
80
81
82
83
84
85
86
87
88
89
90
91
92
93
94
95
96
97
98
99
100
101
102
103
104
105
106
107
108
109
110
111
112
113
114
115
116
117
118
119
120
121
122
123
124
125
126
127
128
129
130
131
132
133
134
135
136
137
138
139
140
141
142
143
144<%--
Created by IntelliJ IDEA.
User: 光玉
Date: 2018/4/3
Time: 18:35
To change this template use File | Settings | File Templates.
--%>
<%@ page contentType="text/html;charset=UTF-8" language="java" pageEncoding="UTF-8" %>
<%@ taglib prefix="c" uri="http://java.sun.com/jsp/jstl/core" %>
<%@ taglib prefix="fmt" uri="http://java.sun.com/jsp/jstl/fmt" %>
<!DOCTYPE html>
<head>
<title>查询商品列表</title>
<meta http-equiv="Content-Type" content="text/html; charset=UTF-8">
<script type="text/javascript" src="<%= request.getContextPath()%>/plugin/layui/layui.all.js"></script>
<link rel="stylesheet" href="<%= request.getContextPath()%>/plugin/layui/css/layui.css">
</head>
<body>
<div style="margin-left: 250px">
<form name="itemsForm" class="layui-form" action="${pageContext.request.contextPath}/items/queryItems.action" method="post">
<label class="layui-form-label">查询条件</label>
<div class="layui-input-block">
<label class="layui-form-label">商品名称</label>
<div class="layui-input-inline">
<input class="layui-input" type="text" name="itemCustom.name" placeholder="请输入关键字">
</div>
<div class="layui-input-inline">
<button class="layui-btn" type="submit" id="find">查询</button>
</div>
<div class="layui-input-inline">
<button class="layui-btn layui-btn-normal" type="button" id="add">添加商品</button>
</div>
<div class="layui-input-inline">
<button class="layui-btn layui-btn-danger" type="button" id="delete">批量删除</button>
</div>
<div class="layui-input-inline">
<button class="layui-btn layui-btn-normal" type="button" id="editQuery">批量修改</button>
</div>
</div>
<div style="width: 900px">
<table class="layui-table" lay-size="sm">
<thead>
<th>批量删除</th>
<th>商品名称</th>
<th>商品价格</th>
<th>商品详情</th>
<th>生产日期</th>
<th>操作</th>
</thead>
<tbody>
<c:forEach items="${itemsList}" var="item">
<tr>
<td><input type="checkbox" name="item_id" value="${item.id}"/> </td>
<td>${item.name}</td>
<td>${item.price}</td>
<td>${item.detail}</td>
<td><fmt:formatDate value="${item.createtime}" pattern="yyyy-MM-dd HH:mm:ss"/> </td>
<td>
<a class="layui-btn layui-btn-sm" href="${pageContext.request.contextPath}/items/editItems.action?id=${item.id}">修改</a>
</td>
</tr>
</c:forEach>
</tbody>
</table>
</div>
</form>
</div>
<script>
//渲染form表单
layui.use('form', function () {
var form = layui.form;
form.render();
});
//要使用弹出层layer以及使用jquery的$要使用下面这种方式
layui.use('layer',function(){
var layer=layui.layer;
var $=layui.$;
// 在弹出层显示添加商品表单
$("#add").on("click",function(){
layer.open({
title:'添加商品',
type:2, //表示通过url传入页面
area:['600px','400px'],
content:['${pageContext.request.contextPath}/items/addItems.action'],
skin:'layui-layer-lan',
btn:['添加','取消'],
yes: function(index,layero){
// 获取iframe中的form表单元素
var formSubmit=window.parent.document.getElementById('layui-layer-iframe1').contentWindow.document.getElementById("formSubmit");
// 提交form表单
formSubmit.submit();
layer.msg('操作成功',{
icon:1,
time:3000
});
// 提交表单后关闭弹出层窗口
layer.close();
// 刷新页面
location.reload();
}
})
});
//批量删除商品
$("#delete").on("click",function () {
// 因为必须传回一个item_id数组才能执行删除操作,所以要判断是否有复选框被选中
// 有复选框被选中时
if($("input[type='checkbox']").is(":checked")){
layer.alert('确定要删除吗',{
icon:3,
btn:['确定','取消'],
yes:function(){
// 修改form表单的提交路径
document.itemsForm.action="${pageContext.request.contextPath}/items/deleteItems.action";
document.itemsForm.submit();
layer.msg('删除成功',{icon:1});
}
});
}
// 若没有复选框被选中
else{
layer.msg('请至少勾选一个商品',{
icon:0,
time:3000
});
}
});
// 进入批量修改页面
$("#editQuery").on("click",function () {
document.itemsForm.action="${pageContext.request.contextPath}/items/editQueryItems.action";
document.itemsForm.submit();
})
})
</script>
</body>
</html>
批量修改的editQueryItems.jsp页面如下1
2
3
4
5
6
7
8
9
10
11
12
13
14
15
16
17
18
19
20
21
22
23
24
25
26
27
28
29
30
31
32
33
34
35
36
37
38
39
40
41
42
43
44
45
46
47
48
49
50
51
52
53
54
55
56
57
58
59
60
61
62
63
64
65
66
67
68
69
70
71
72
73
74
75
76<%--
Created by IntelliJ IDEA.
User: 光玉
Date: 2018/4/3
Time: 18:35
To change this template use File | Settings | File Templates.
--%>
<%@ page contentType="text/html;charset=UTF-8" language="java" pageEncoding="UTF-8" %>
<%@ taglib prefix="c" uri="http://java.sun.com/jsp/jstl/core" %>
<%@ taglib prefix="fmt" uri="http://java.sun.com/jsp/jstl/fmt" %>
<!DOCTYPE html>
<head>
<title>批量修改商品</title>
<meta http-equiv="Content-Type" content="text/html; charset=UTF-8">
<script type="text/javascript" src="<%= request.getContextPath()%>/plugin/layui/layui.all.js"></script>
<link rel="stylesheet" href="<%= request.getContextPath()%>/plugin/layui/css/layui.css">
</head>
<body>
<div style="margin-left: 250px">
<form name="editItemsForm" class="layui-form" action="${pageContext.request.contextPath}/items/editQueryItems.action" method="post">
<label class="layui-form-label">查询条件</label>
<div class="layui-input-block">
<label class="layui-form-label">商品名称</label>
<div class="layui-input-inline">
<input class="layui-input" type="text" name="itemCustom.name" placeholder="请输入关键字">
</div>
<div class="layui-input-inline">
<button class="layui-btn" type="submit" id="find">查询</button>
</div>
<div class="layui-input-inline">
<button class="layui-btn layui-btn-normal" type="button" id="editQuery">提交修改</button>
</div>
</div>
<div style="width: 900px">
<table class="layui-table" lay-size="sm">
<thead>
<th>商品名称</th>
<th>商品价格</th>
<th>商品详情</th>
<th>生产日期</th>
</thead>
<tbody>
<c:forEach items="${itemsList}" var="item" varStatus="status">
<tr>
<td class="layui-hide"><input type="text" name="itemsList[${status.index}].id" value="${item.id}"></td>
<td><input type="text" name="itemsList[${status.index}].name" value="${item.name}"/></td>
<td><input type="text" name="itemsList[${status.index}].price" value="${item.price}"/></td>
<td><input type="text" name="itemsList[${status.index}].detail" value="${item.detail}"/></td>
<td><input type="text" name="itemsList[${status.index}].createtime" value="<fmt:formatDate value="${item.createtime}" pattern="yyyy-MM-dd HH:mm:ss"/> "/></td>
<td class="layui-hide"><input type="text" name="itemsList[${status.index}].pic" value="${item.pic}"/></td>
</tr>
</c:forEach>
</tbody>
</table>
</div>
</form>
</div>
<script>
//渲染form表单
layui.use('form', function () {
var form = layui.form;
form.render();
});
var $=layui.$;
$("#editQuery").on("click",function () {
document.editItemsForm.action="${pageContext.request.contextPath}/items/editQueryItemsSubmit.action";
document.editItemsForm.submit();
})
</script>
</body>
</html>
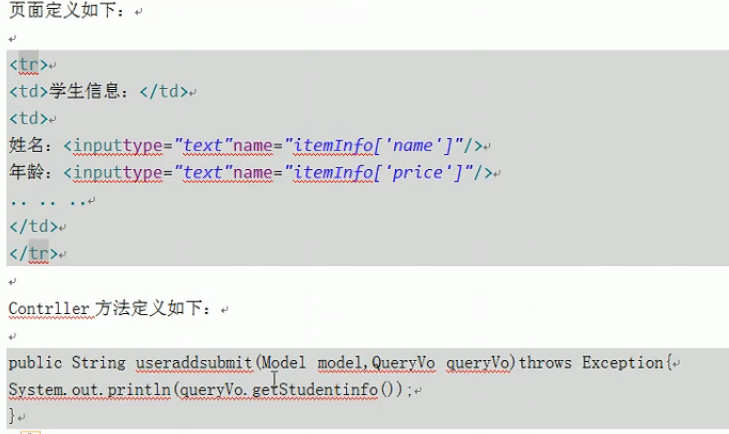
前端jsp中属性名和后台属性的对应关系: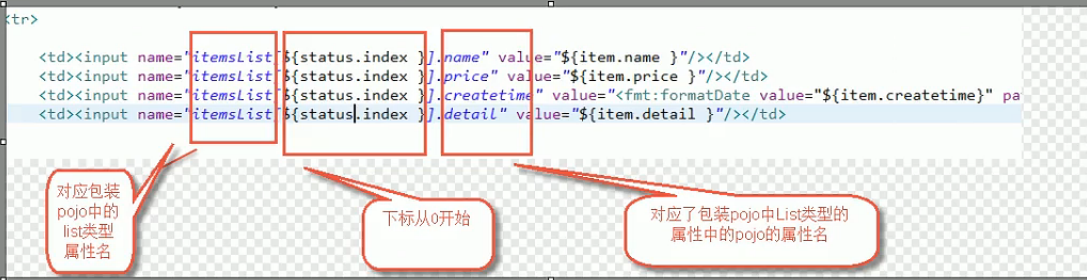
整体运行结果如下:
添加商品: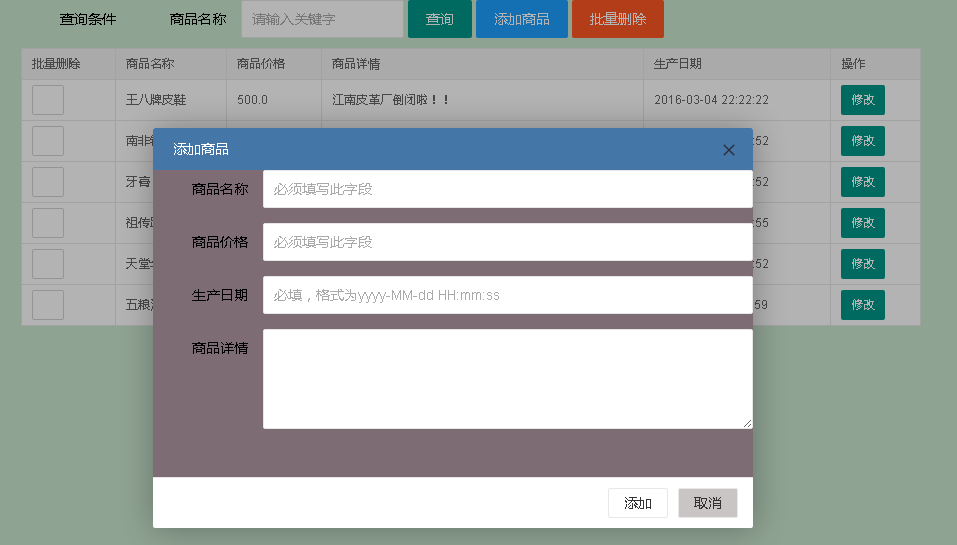
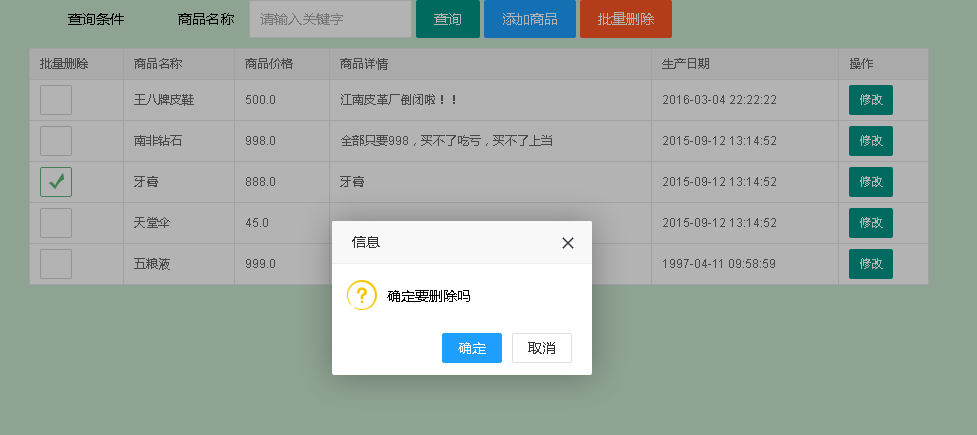
批量删除商品(未选中复选框和选中时会弹出相应的提示信息)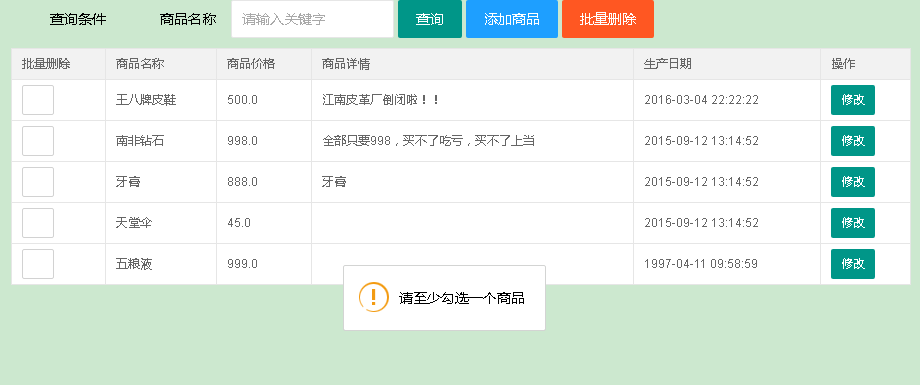
批量修改商品
批量修改前页面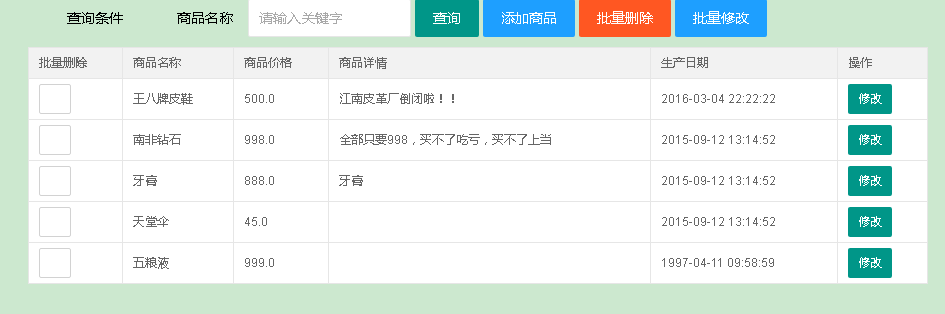
批量修改页面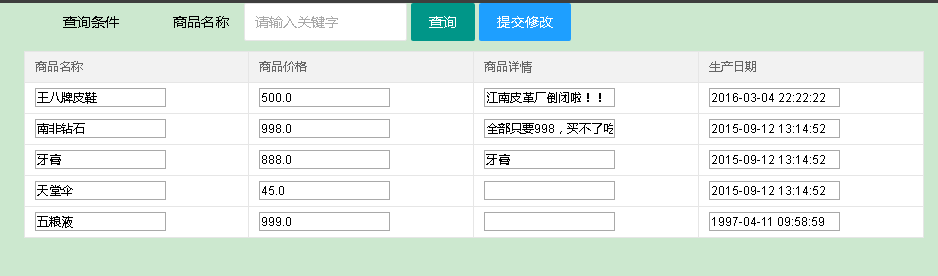
批量修改后页面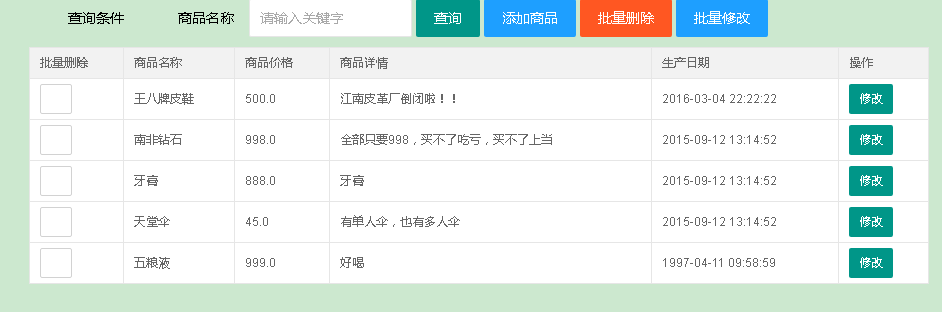
绑定map类型
map类型的绑定和list绑定类似,也是需要在包装类中声明map
参考如下方式进行绑定: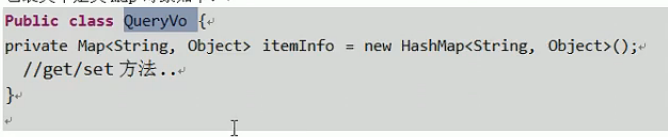
数据回显
当我们提交表单出现错误时,重新回到表单时需要显示刚才提交的数据
之前我们采用将数据放在request域中然后请求转发到表单页面,运用el表达式将数据回显。
在springmvc中我们通过Model对象的addAttribute(“id”,id),将简单类型的数据
传入request域(注意:在进入修改页面的controller方法中和提交修改商品信息方法
model.addAttribute方法设置的key一致)。通过Model的addAttribute(“pojo”,pojo)方法
将pojo类型的数据也是传入到request域中,然后通过el表达式完成取出request域中的数据,
这是pojo类型数据回显的第一种方法,如下:1
2
3
4
5
6
7
8
9
10@RequestMapping("/editItemSubmit")
public String editItemSubmit(Model model,Integer id,ItemCustom itemCustom) throws Exception{
//数据回显
model.addAttribute("id",id);
//将itemCustom对象回显到前端页面的"item"中
model.addAttribute("item",itemCustom);
itemsService.updateItems(id,itemCustom);
return "editItem";
}
第二种方法是使用@ModelAttribute()注解,比如我们要将itemCustomm回显,
即在形参中使用@ModelAttribute(value = “itemCustom”)即可
@ModelAttribute()注解还可以将方法的返回值也传到页面1
2
3
4
5
6
7
8
9/单独将商品类型的方法提取出来,将方法返回值填充到request域,在页面提示
@ModelAttribute("itemsType")
public Map<String,String> getItemsType() throws Exception{
HashMap<String,String> itemsType=new HashMap<>();
itemsType.put("001","data type");
itemsType.put("002","clothes");
return itemsType;
}
在itemsList中添加如下语句显示1
2
3
4
5
6
7<td>
<select>
<c:forEach items="${itemsType}" var="item">
<option value="${item.key}">${item.value}</option>
</c:forEach>
</select>
</td>
可以在页面上接收到对应的数据
异常处理
系统中的异常分为两类:
- 预期处理异常
- 运行时异常(RuntimeException)
预期异常通过捕获异常来获取异常信息,让我们能根据异常信息来处理异常,
而运行时异常则需要通过规范代码开发,测试等方式来减少其发生次数
1.异常处理的思路
在dao,service,controller层遇到异常时,都会向上抛出异常。这些异常
由springmvc DispatcherServlet前端控制器交给ExceptionResolver异常
处理器进行处理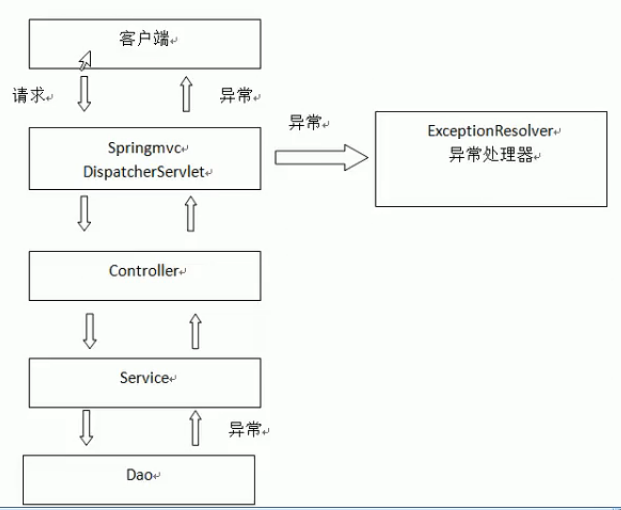
注意:springmvc全局配置统一的异常处理器(一个系统只有一个异常处理器)
2.编写自定义异常类
在src目录下新建exception包,编写继承Exception的CustomException1
2
3
4
5
6
7
8
9
10
11
12
13
14
15
16
17
18
19
20
21
22
23
24package exception;
/**
* 自定义异常类,用来将预期异常信息返回到程序中
*/
public class CustomException extends Exception{
// 异常信息(有可能是预期异常或者运行时异常)
// 需要在CustomExceptionResolver异常处理器判断
public String message;
public String CustomException(String message){
// super(message);
this.message=message;
}
@Override
public String getMessage() {
return message;
}
public void setMessage(String message) {
this.message = message;
}
}
3.编写全局异常处理器
首先我们需要分析异常类型:
如果是系统自定义的异常,则直接取出错误信息,并在错误页面中显示
如果不是系统自定义异常,则需要构造一个自定义异常类型(抛出未知错误)
使用springmvc提供的HandlerExceptionResolver接口
在exception包下创建CustomExceptionResolver.java文件实现HandlerExceptionResolver接口1
2
3
4
5
6
7
8
9
10
11
12
13
14
15
16
17
18
19
20
21
22
23
24
25
26
27
28
29
30
31
32
33
34package exception;
import org.springframework.web.servlet.HandlerExceptionResolver;
import org.springframework.web.servlet.ModelAndView;
import javax.servlet.http.HttpServletRequest;
import javax.servlet.http.HttpServletResponse;
public class CustomExceptionResolver implements HandlerExceptionResolver{
// 全局异常处理类
// Exception e就是系统抛出的异常
@Override
public ModelAndView resolveException(HttpServletRequest httpServletRequest, HttpServletResponse httpServletResponse, Object o, Exception e) {
CustomException customException=null;
String message=null;
///如果是系统自定义异常,则直接取出异常
if(e instanceof CustomException){
customException=(CustomException)e;
}
else{ //否则抛出“未知错误”
customException=new CustomException("未知错误55555");
}
message=customException.getMessage();
//将错误信息传到显示错误信息的页面
ModelAndView modelAndView=new ModelAndView();
modelAndView.addObject("message",message);
modelAndView.setViewName("errorPage");
return modelAndView;
}
}
在dao,controller,service层处抛出的异常都交给异常处理器处理
4.配置全局异常处理器
在springmvc.xml中配置全局异常处理器1
2
3
4<!-- 配置全局异常处理器
由于实现了HandlerExceptionResolver,系统知道是全局异常处理器
不需要设置id -->
<bean class="exception.CustomExceptionResolver"/>
5.测试异常
如果是手动抛出异常,则在错误页面显示自定义异常信息,
如果不是手动抛出异常,说明是运行时错误(比如说:除0)
则在页面中显示“未知错误55555”
可以测试一下根据id查找修改的商品信息
将ItemsServiceImpl中的findItemsById改写一下1
2
3
4
5
6
7
8
9
10
11
12
13
14
15
16
17
18@Override
public ItemCustom findItemsById(Integer id) throws Exception{
//通过mapper包下itemsMapper中的selectByPrimaryKey方法找到相应的item
Items items=itemsMapper.selectByPrimaryKey(id);
// 判断根据id找到的items对象是否为空
// 若为空,则抛出下面的自定义异常
if(items == null){
throw new CustomException("修改商品信息错误,不存在对应商品!");
}
//考虑到可能扩展另外的属性,这里使用继承了Items类的ItemCustom类
ItemCustom itemCustom=new ItemCustom();
//通过spring提供的BeanUtils.copyProperties方法将items的属性拷贝到itemCustom中
BeanUtils.copyProperties(items,itemCustom);
return itemCustom;
}
在地址栏中输入http://localhost:8080/ssm-highclass/items/editItems.action?id=555
由于没有id为555的商品信息,系统发现异常后会提交给异常处理器处理
异常处理器会将错误信息显示到页面上
异常可以在service中抛出,也可以在controller中抛出,主要看是否与业务功能有关
与业务功能有关的在service抛出异常,否则在controller抛出异常
图片上传
1.设置上传图片的存储目录
企业一般都是通过服务器存放图片,这里使用的是intellij idea来设置图片存储目录
在tomcat的Deployment下引入External Source,只要是电脑上的一个文件夹就行,
配置路径为/img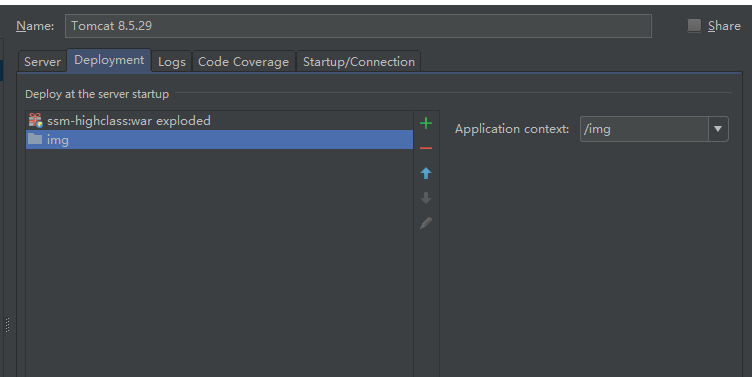
输入http://localhost:8080/img/图片名称即可访问
图片尽量分级存放到相应目录中,提高访问速度
注意:需要在form中添加属性enctype=”multipart/form-data”
需要通过springmvc图片解析器解析
2.配置图片上传解析器
这里需要引入两个包:commons-fileupload-1.2.2.jar和依赖包commons-io-2.4.jar
然后在springmvc.xml中配置图片上传解析器1
2
3
4
5
6
7
8
9<!-- 配置图片上传解析器 -->
<!-- springmvc的multipartResolver图片解析器依赖于commons-fileupload.jar包 -->
<bean id="multipartResolver" class="org.springframework.web.multipart.commons.CommonsMultipartResolver">
<property name="maxUploadSize">
<!-- 最大上传文件容量(字节为单位) -->
<!-- 这里设置了最大为10Mb -->
<value>10485760</value>
</property>
</bean>
3.编写controller
在controller的editItemsSubmit方法下新增形参MultipartFile items_img1
2
3
4
5
6
7
8
9
10
11
12
13
14
15
16
17
18
19
20
21
22
23
24
25
26
27
28
29
30
31@RequestMapping("/editItemsSubmit")
public String editItemsSubmit(HttpServletRequest request, Integer id, ItemCustom itemCustom, MultipartFile items_img) throws Exception{
//通过service返回修改后的页面
//形参中传递了pojo类型参数(即itemCustom)
// 如果图片不为空
if(items_img!=null && items_img.getOriginalFilename()!=null && items_img.getOriginalFilename().length()>0){
//图片上传物理路径
String img_path="D:\\JavaWeb\\img\\";
//获取图片原始名称
String originalFilename=items_img.getOriginalFilename();
//生成新的图片名称
//为了避免文件名冲突,使用java的UUID随机生成字符串再加上原来图片后缀名构成新的名字
String newFileName= UUID.randomUUID() + originalFilename.substring(originalFilename.lastIndexOf("."));
//新图片
File newFile=new File(img_path+newFileName);
//将内存中的数据写入磁盘
items_img.transferTo(newFile);
//将新图片名称写到数据库中
itemCustom.setPic(newFileName);
System.out.println(newFileName);
}
// 更新数据库数据
itemsService.updateItems(id,itemCustom);
//重定向到商品查询列表
return "forward:queryItems.action";
}
在editItems.jsp添加图片显示代码1
2
3
4
5
6
7
8
9
10
11
12 <div class="layui-form-item">
<label class="layui-form-label">商品图片</label>
<div class="layui-input-inline">
<c:if test="${itemCustom.pic != null}">
<%-- 取绝对路径 --%>
<img src="/img/${itemCustom.pic}" width="100" height="100"/><br/>
</c:if>
<input type="file" name="items_img">
<%-- 不写上下面这一行的话就不能把已有的pic的值传回到后台中 --%>
<input class="layui-hide" type="text" name="pic" value="${itemCustom.pic}"/>
</div>
</div>
效果如下: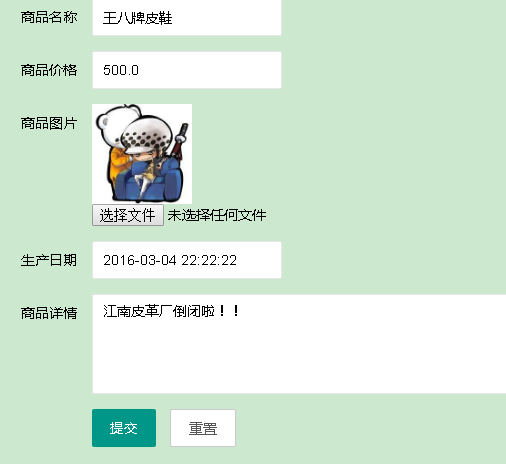
json数据交互
json数据格式比较简单,易于阅读和编写,经常用于接口传输,html中ajax异步刷新等领域中。
使用json格式也比较容易进行解析。
1.springmvc进行json交互过程
首先,我们来了解一下springmvc进行json交互的过程。
客户端发起请求,有两种请求方式
- 请求json串
这种情况下需要使用@RequestBody注解将json串转换为java对象 - 请求key/value
无论是json串还是key/value都要@ResponseBody将java对象转换为json串输出到客户端,不需要@RequestBody转换为java对象
方便客户端进行解析
2.准备环境
springmvc默认使用MappingJacksonHttpMessageConverter对json数据进行转换操作,
这里引入了fastjson-1.2.47.jar包来进行配置
3.配置springmvc的json转换器
我这里使用的是springmvc的注解驱动,需要在注解驱动中加入fastjson的配置1
2
3
4
5
6
7
8
9
10
11
12
13<!-- 这里使用注解驱动来进行配置,在注解驱动中加入fastjson的配置 -->
<mvc:annotation-driven conversion-service="conversionService">
<mvc:message-converters register-defaults="true">
<!-- 避免IE执行AJAX时,返回JSON出现下载文件 -->
<bean id="fastJsonHttpMessageConverter" class="com.alibaba.fastjson.support.spring.FastJsonHttpMessageConverter">
<property name="supportedMediaTypes">
<list>
<value>application/json;charset=UTF-8</value>
</list>
</property>
</bean>
</mvc:message-converters>
</mvc:annotation-driven>
4.编写json转换控制器
1 | package controller; |
5.编写json测试的jsp文件
在web目录下新建jsonTest.jsp文件,注意不要把文件放到WEB-INF目录下1
2
3
4
5
6
7
8
9
10
11
12
13
14
15
16
17
18
19
20
21
22
23
24
25
26
27
28
29
30
31
32
33
34
35
36
37
38
39
40
41
42
43
44
45
46
47
48
49
50
51<%--
Created by IntelliJ IDEA.
User: 光玉
Date: 2018/4/13
Time: 11:37
To change this template use File | Settings | File Templates.
--%>
<%@ page contentType="text/html;charset=UTF-8" language="java" pageEncoding="utf-8" %>
<html>
<head>
<title>json转换测试</title>
<script type="text/javascript" src="<%= request.getContextPath()%>/plugin/layui/layui.all.js"></script>
<link rel="stylesheet" href="<%= request.getContextPath()%>/plugin/layui/css/layui.css">
<%--<script type="text/javascript" src="<%= request.getContextPath()%>/plugin/jquery/jquery.js"></script>--%>
</head>
<body>
<button class="layui-btn" type="button" id="requestJson">请求json</button>
<button class="layui-btn layui-btn-normal" type="button" id="responseJson">请求key/value</button>
<script>
var $=layui.$;
// 请求是json串,返回的也是json串
$("#requestJson").on("click",function () {
$.ajax({
type:'post',
url:'${pageContext.request.contextPath}/requestJson.action', //设置请求的url
contentType:'application/json;charset=utf-8', //将请求类型设置为json格式
data:'{"name":"天堂伞", "price":"45"}',
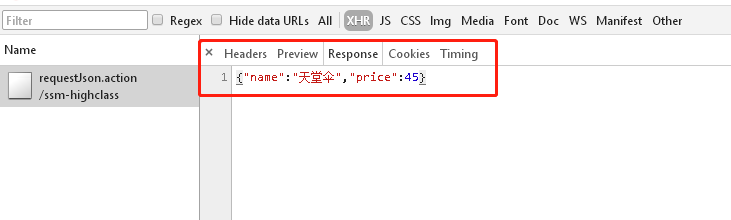
success:function (data) { //返回json
alert(data.name);
}
})
});
//请求key/value,返回json串
$("#responseJson").on("click",function () {
// 请求是json串,返回的也是json串
$.ajax({
type:'post',
url:'${pageContext.request.contextPath}/responseJson.action', //设置请求的url
// contentType:'application/json;charset=utf-8', //默认即为传输key/value格式的数据,不需要设置
data:'name=毕业花束&price=79', //key/value类型数据
success:function (data) { //返回json
alert(data.name);
}
})
})
</script>
</body>
</html>
6.查看运行结果
在地址栏中输入http://localhost:8080/ssm-highclass/jsonTest.jsp,显示出两个按钮
“请求json“和”请求key/value“,分别点击,显示效果如下
request请求json的content-type格式以及json格式数据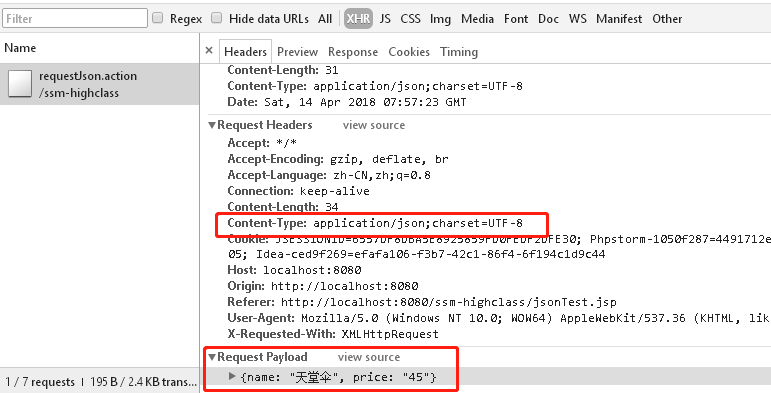
request请求key/value的content-type格式以及key/value格式数据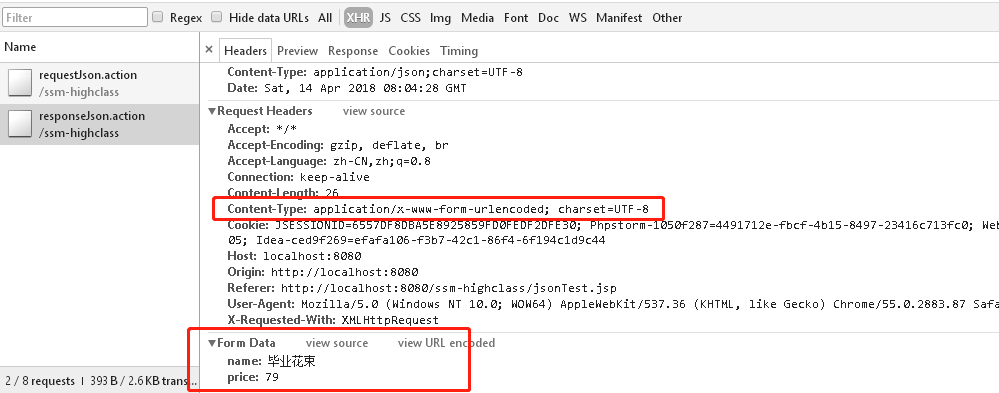
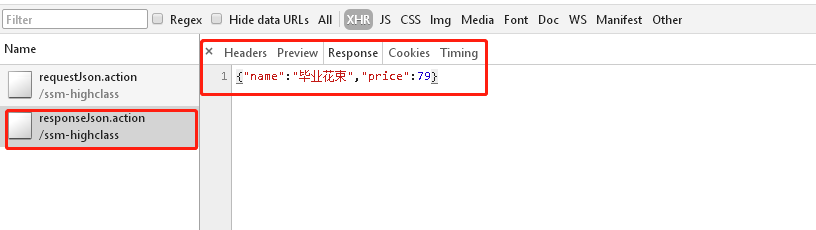
可以看到,两种不同的请求方式,最终都返回json串
7.记录一下配置json踩过的坑
由于我使用的是spring4.x的版本,已经不能再使用Jackson1.x版本来进行配置。
还有就是,在网上看到使用spring4.x配置jackson2.5.0版本,也试着去配了一下,
还是不行。最终还是使用fastjson配置成功。
RESTful架构
1.了解RESTful
RESTful架构,就是目前最流行的一种互联网软件架构。它结构清晰、符合标准、易于理解、扩展方便,所以正得到越来越多网站的采用。若要了解更多概念,可以看看阮一峰的博客
2.使用RESTful
1.需求
使用RESTful方式实现根据id查看商品信息
2.配置前端控制器
之前配置的前端控制器url模式是”.action”,而RESTful方式url模式是”/“
根据RESTful方式配置前端控制器,即在web.xml中添加如下内容1
2
3
4
5
6
7
8
9
10
11
12
13
14
15
16
17
18
19<!-- RESTful前端控制器配置,可以和之前设置的.action前端控制器并存 -->
<servlet>
<servlet-name>springmvcRESTful</servlet-name>
<servlet-class>org.springframework.web.servlet.DispatcherServlet</servlet-class>
<!-- 加载springmvc配置文件 -->
<init-param>
<param-name>contextConfigLocation</param-name>
<!-- 配置文件的地址,如果不配置contextConfigLocation,
默认查找的配置文件名称是classpath下的:servlet名称+"-servlet.xml"即springmvc-servlet.xml-->
<param-value>classpath:config/spring/springmvc.xml</param-value>
</init-param>
</servlet>
<servlet-mapping>
<servlet-name>springmvcRESTful</servlet-name>
<!-- 可以配置/ 表示此工程所有请求全部由springmvc解析,此方式可以实现RESTful(表征性状态转移,总结起来应该是是一种简洁的架构风格)方式,
静态文件不能由springmvc解析,需要特殊处理 -->
<url-pattern>/</url-pattern>
</servlet-mapping>
3.编写controller
使用了url模板映射方式(结合下面的controller理解)
- 请求参数映射到{id}
- {id}传递到方法里面的@PathVariable(“id”)中
- 通过@Pathvariable把{id}传递到方法里面的id
利用servlet拦截请求目录功能,实现无扩展名的restfull风格1
2
3
4
5
6
7
8
9
10// RESTful格式编写
// 根据id查询商品,输出为json串
// 使用/itemsView/{id}将"{}"里的参数传到@PathVariable指定的名称中
// 若有多个,如:/itemsView/{id}/{name} ,则在形参中再定义相同数量的@PathVariable
@RequestMapping("/itemsView/{id}")
public @ResponseBody ItemCustom itemsView(@PathVariable("id") Integer id) throws Exception{
ItemCustom itemCustom=itemsService.findItemsById(id);
return itemCustom;
}
4.查看运行结果
在浏览器地址栏中输入http://localhost:8080/ssm-highclass/items/itemsView/1
可以在页面中看到json格式的数据
但是,在配置了RESTful方式后,当我们要访问web过程中的静态资源时,
会发现访问不了。这是因为springmvc在设置了RESTful方式后会对静态资源
也进行拦截解析。因此,我们要在web.xml中设置静态资源解析方式
在web.xml中添加如下内容:1
2
3
4
5<!-- 当我们配置了RESTful方式访问时,静态资源(js,css,img...)也会经过springmvc进行解析
要避免这种情况,就要对静态资源的解析进行配置 -->
<!-- 比如说web/plugin/jquery是放jquery插件的地方,里面包含jqery.js文件
配置后凡是“/plugin/jquery/”下的请求,都会在过程目录下的“/plugin/jquery/”下找相应文件 -->
<mvc:resources mapping="/plugin/jquery/**" location="/plugin/jquery/"/>
拦截器
用户请求到DispatherServlet中,DispatherServlet调用HandlerMapping查找Handler,HandlerMapping返回一个拦截的链儿(多个拦截),springmvc中的拦截器是通过HandlerMapping来进行拦截的
拦截器通常用于用户认证(登录信息认证之类的),权限认证等方面
1.设置springmvc拦截器方法
在controller包下新建interceptor包,在interceptor包下新建HandlerInterceptorTest1.java继承HandlerInterceptor接口1
2
3
4
5
6
7
8
9
10
11
12
13
14
15
16
17
18
19
20
21
22
23
24
25
26
27
28
29
30
31
32
33
34
35
36
37
38
39package controller.interceptor;
import org.springframework.web.servlet.HandlerInterceptor;
import org.springframework.web.servlet.ModelAndView;
import javax.servlet.http.HttpServletRequest;
import javax.servlet.http.HttpServletResponse;
public class HandlerInterceptorTest1 implements HandlerInterceptor{
// 重写HandlerInterceptor里的三个方法
@Override
public boolean preHandle(HttpServletRequest httpServletRequest, HttpServletResponse httpServletResponse, Object o) throws Exception {
// preHanle方法是在进入handler之前进行拦截
// 通常用于用户登录认证拦截,用户权限拦截
System.out.println("HandlerInterceptorTest1....preHandle");
//返回false表示进行拦截,true则表示不拦截,继续执行handler
return false;
}
@Override
public void postHandle(HttpServletRequest httpServletRequest, HttpServletResponse httpServletResponse, Object o, ModelAndView modelAndView) throws Exception {
// postHandle方法是在进入handler之后,返回ModelAndView之前进行拦截
// 可以在这里边放置一些公共的数据或视图资源
System.out.println("HandlerInterceptorTest1....postHandle");
}
@Override
public void afterCompletion(HttpServletRequest httpServletRequest, HttpServletResponse httpServletResponse, Object o, Exception e) throws Exception {
// afterCompletion方法在执行完handler之后执行
// 做系统统一异常处理,进行方法执行性能监控,在prehandler中设置一个时间点,在afterCompletion设置一个时间点,两个时间点的差就是执行时长
// 实现系统统一日志记录
System.out.println("HandlerInterceptorTest1....afterCompletion");
}
}
再编写一个HandlerInterceptorTest2.java继承HandlerInterceptor接口1
2
3
4
5
6
7
8
9
10
11
12
13
14
15
16
17
18
19
20
21
22
23
24
25
26
27
28
29
30
31
32
33
34
35
36
37
38
39package controller.interceptor;
import org.springframework.web.servlet.HandlerInterceptor;
import org.springframework.web.servlet.ModelAndView;
import javax.servlet.http.HttpServletRequest;
import javax.servlet.http.HttpServletResponse;
public class HandlerInterceptorTest2 implements HandlerInterceptor{
// 重写HandlerInterceptor里的三个方法
@Override
public boolean preHandle(HttpServletRequest httpServletRequest, HttpServletResponse httpServletResponse, Object o) throws Exception {
// preHanle方法是在进入handler之前进行拦截
// 通常用于用户登录认证拦截,用户权限拦截
System.out.println("HandlerInterceptorTest2....preHandle");
//返回false表示进行拦截,true则表示不拦截,继续执行handler
return false;
}
@Override
public void postHandle(HttpServletRequest httpServletRequest, HttpServletResponse httpServletResponse, Object o, ModelAndView modelAndView) throws Exception {
// postHandle方法是在进入handler之后,返回ModelAndView之前进行拦截
// 可以在这里边放置一些公共的数据或视图资源
System.out.println("HandlerInterceptorTest2....postHandle");
}
@Override
public void afterCompletion(HttpServletRequest httpServletRequest, HttpServletResponse httpServletResponse, Object o, Exception e) throws Exception {
// afterCompletion方法在执行完handler之后执行
// 做系统统一异常处理,进行方法执行性能监控,在prehandler中设置一个时间点,在afterCompletion设置一个时间点,两个时间点的差就是执行时长
// 实现系统统一日志记录
System.out.println("HandlerInterceptorTest2....afterCompletion");
}
}
2.全局配置拦截器
在springmvc中添加如下内容:1
2
3
4
5
6
7
8
9
10
11
12
13
14<!-- 配置全局拦截器 -->
<mvc:interceptors>
<!-- 配置拦截器1 -->
<mvc:interceptor>
<!-- 这里的“/**”表示所有url请求都进行拦截 -->
<mvc:mapping path="/**"/>
<bean class="controller.interceptor.HandlerInterceptorTest1"/>
</mvc:interceptor>
<!-- 配置拦截器2 -->
<mvc:interceptor>
<mvc:mapping path="/**"/>
<bean class="controller.interceptor.HandlerInterceptorTest2"/>
</mvc:interceptor>
</mvc:interceptors>
3.测试拦截器
拦截器1和2都放行,测试结果为:1
2
3
4
5
6
7
8HandlerInterceptor1...preHandle
HandlerInterceptor2...preHandle
HandlerInterceptor2...postHandle
HandlerInterceptor1...postHandle
HandlerInterceptor2...afterCompletion
HandlerInterceptor1...afterCompletion
即preHandle顺序执行,postHandle和afterCompletion倒序执行
拦截器1放行,2拦截(界面显示是空白的,不会出现错误信息,在控制台中查看)1
2
3HandlerInterceptor1...preHandle
HandlerInterceptor2...preHandle
HandlerInterceptor1...afterCompletion
可以看出如果preHandle不放行,postHandle、afterCompletion都不执行。只要有一个拦截器不放行,controller不能执行完成。
拦截器1和2都进行拦截,结果为1
HandlerInterceptor1...preHandle
说明了只有在前边的拦截器放行后,后边的preHandle方法才会执行
模拟登陆认证
现在的用户登录认证,权限认证大多都通过shiro来实现。由于现在对shiro还不太了解,这里便通过对session的操作,来模拟登陆认证过程
1.编写LoginController控制器
通过LoginController控制器来进行session的管理
在controller包下新建LoginController.java1
2
3
4
5
6
7
8
9
10
11
12
13
14
15
16
17
18
19
20
21
22
23
24
25
26
27
28
29
30package controller;
import org.springframework.stereotype.Controller;
import org.springframework.web.bind.annotation.RequestMapping;
import javax.servlet.http.HttpSession;
@Controller
public class LoginController {
// 登录
@RequestMapping("/login")
public String login(HttpSession httpSession,String username,String password){
// 通过前台登录,将username保存到session中
httpSession.setAttribute("username",username);
// 重定向到商品查询页面
return "redirect:items/queryItems.action";
}
// 退出
@RequestMapping("/logout")
public String logout(HttpSession httpSession){
// 让session过期,清除里面保存的username信息
httpSession.invalidate();
// 重定向回商品查询页面
return "redirect:login.action";
}
}
2.编写登录页面
我们需要一个登录页面来进行登录认证1
2
3
4
5
6
7
8
9
10
11
12
13
14
15
16
17
18
19
20
21
22
23
24
25
26
27
28
29
30
31
32
33
34
35
36
37
38
39
40
41
42
43
44
45
46
47
48
49
50
51
52
53
54
55
56
57
58
59
60
61
62<%--
Created by IntelliJ IDEA.
User: 光玉
Date: 2018/4/14
Time: 22:40
To change this template use File | Settings | File Templates.
--%>
<%@ page contentType="text/html;charset=UTF-8" language="java" pageEncoding="UTF-8" %>
<!DOCTYPE html>
<html>
<head>
<title>登录认证</title>
<meta name="viewport" content="width=device-width, initial-scale=1">
<script type="application/x-javascript"> addEventListener("load", function() { setTimeout(hideURLbar, 0); }, false); function hideURLbar(){ window.scrollTo(0,1); } </script>
<meta name="keywords" content="Login" />
<link href="${pageContext.request.contextPath}/assets/css/style.css" rel='stylesheet' type='text/css' />
<!--webfonts-->
<link href='http://fonts.useso.com/css?family=PT+Sans:400,700,400italic,700italic|Oswald:400,300,700' rel='stylesheet' type='text/css'>
<link href='http://fonts.useso.com/css?family=Exo+2' rel='stylesheet' type='text/css'>
<!--//webfonts-->
<%--<script src="http://ajax.useso.com/ajax/libs/jquery/1.11.0/jquery.min.js"></script>--%>
<script src="${pageContext.request.contextPath}/plugin/jquery/jquery.js"></script>
</head>
<body>
<script>$(document).ready(function(c) {
$('.close').on('click', function(c){
$('.login-form').fadeOut('slow', function(c){
$('.login-form').remove();
});
});
});
</script>
<!--SIGN UP-->
<h1>Login</h1>
<div class="login-form">
<div class="close"> </div>
<div class="head-info">
<label class="lbl-1"> </label>
<label class="lbl-2"> </label>
<label class="lbl-3"> </label>
</div>
<div class="clear"> </div>
<div class="avtar">
<img src="${pageContext.request.contextPath}/assets/images/avtar.png" />
</div>
<form action="${pageContext.request.contextPath}/login.action" method="post">
<input type="text" class="text" name="username" value="username" onfocus="this.value = '';" onblur="if (this.value == '') {this.value = 'username';}" >
<div class="key">
<input type="password" name="password" value="password" onfocus="this.value = '';" onblur="if (this.value == '') {this.value = 'password';}">
</div>
<div class="signin">
<input type="submit" value="Login" >
</div>
</form>
</div>
<div class="copy-rights">
<p>Copyright © 2018.光玉</p>
</div>
</body>
</html>
登录页面所需的静态资源保存在/web/assets下,由于之前设置了RESTful模式,会对静态资源也进行解析,这里需要在springmvc中进行配置1
2<!-- 在之前配置静态资源的地方添加一下内容 -->
<mvc:resources mapping="/assets/**" location="/assets/"/>
3.在商品查询页面显示用户名
为商品查询页面添加顶部导航栏显示,在用户登录时显示相应的登录名,没有登录时在右上角显示“请登录”。修改后的itemsList.jsp内容如下1
2
3
4
5
6
7
8
9
10
11
12
13
14
15
16
17
18
19
20
21
22
23
24
25
26
27
28
29
30
31
32
33
34
35
36
37
38
39
40
41
42
43
44
45
46
47
48
49
50
51
52
53
54
55
56
57
58
59
60
61
62
63
64
65
66
67
68
69
70
71
72
73
74
75
76
77
78
79
80
81
82
83
84
85
86
87
88
89
90
91
92
93
94
95
96
97
98
99
100
101
102
103
104
105
106
107
108
109
110
111
112
113
114
115
116
117
118
119
120
121
122
123
124
125
126
127
128
129
130
131
132
133
134
135
136
137
138
139
140
141
142
143
144
145
146
147
148
149
150
151
152
153
154
155
156
157
158
159
160
161
162
163
164
165
166
167
168
169
170
171
172
173
174<%--
Created by IntelliJ IDEA.
User: 光玉
Date: 2018/4/3
Time: 18:35
To change this template use File | Settings | File Templates.
--%>
<%@ page contentType="text/html;charset=UTF-8" language="java" pageEncoding="UTF-8" %>
<%@ taglib prefix="c" uri="http://java.sun.com/jsp/jstl/core" %>
<%@ taglib prefix="fmt" uri="http://java.sun.com/jsp/jstl/fmt" %>
<!DOCTYPE html>
<head>
<title>查询商品列表</title>
<meta http-equiv="Content-Type" content="text/html; charset=UTF-8">
<script type="text/javascript" src="<%= request.getContextPath()%>/plugin/layui/layui.all.js"></script>
<link rel="stylesheet" href="<%= request.getContextPath()%>/plugin/layui/css/layui.css">
</head>
<!-- 这下面是修改的部分 -->
<body class="layui-layout-body">
<!-- 顶部导航栏 -->
<div class="layui-layout layui-layout-admin">
<div class="layui-header">
<div class="layui-logo">商品管理后台</div>
<ul class="layui-nav layui-layout-right">
<!-- 判断在session中是否保存着username,若存在,则显示出用户名
否则,显示“请登录” -->
<c:if test="${username != null}">
<li class="layui-nav-item">
<a href="javascript:;">
<img src="http://t.cn/RCzsdCq" class="layui-nav-img">
${username}
</a>
</li>
<li class="layui-nav-item">
<a href="${pageContext.request.contextPath}/logout.action">退了</a>
</li>
</c:if>
<c:if test="${username == null}">
<li class="layui-nav-item">
<a href="${pageContext.request.contextPath}/login.jsp">请登录</a>
</li>
</c:if>
</ul>
</div>
</div>
<div style="margin-left: 250px;margin-top:60px">
<!-- 这上面是修改的部分 -->
<form name="itemsForm" class="layui-form" action="${pageContext.request.contextPath}/items/queryItems.action" method="post">
<label class="layui-form-label">查询条件</label>
<div class="layui-input-block">
<label class="layui-form-label">商品名称</label>
<div class="layui-input-inline">
<input class="layui-input" type="text" name="itemCustom.name" placeholder="请输入关键字">
</div>
<div class="layui-input-inline">
<button class="layui-btn" type="submit" id="find">查询</button>
</div>
<div class="layui-input-inline">
<button class="layui-btn layui-btn-normal" type="button" id="add">添加商品</button>
</div>
<div class="layui-input-inline">
<button class="layui-btn layui-btn-danger" type="button" id="delete">批量删除</button>
</div>
<div class="layui-input-inline">
<button class="layui-btn layui-btn-normal" type="button" id="editQuery">批量修改</button>
</div>
</div>
<div style="width: 900px">
<table class="layui-table" lay-size="sm">
<thead>
<th>批量删除</th>
<th>商品名称</th>
<th>商品价格</th>
<th>商品详情</th>
<th>生产日期</th>
<th>操作</th>
</thead>
<tbody>
<c:forEach items="${itemsList}" var="item">
<tr>
<td><input type="checkbox" name="item_id" value="${item.id}"/> </td>
<td>${item.name}</td>
<td>${item.price}</td>
<td>${item.detail}</td>
<td><fmt:formatDate value="${item.createtime}" pattern="yyyy-MM-dd HH:mm:ss"/> </td>
<td>
<a class="layui-btn layui-btn-sm" href="${pageContext.request.contextPath}/items/editItems.action?id=${item.id}">修改</a>
</td>
</tr>
</c:forEach>
</tbody>
</table>
</div>
</form>
</div>
<script>
//渲染form表单
layui.use('form', function () {
var form = layui.form;
form.render();
});
//要使用弹出层layer以及使用jquery的$要使用下面这种方式
layui.use('layer',function(){
var layer=layui.layer;
var $=layui.$;
// 在弹出层显示添加商品表单
$("#add").on("click",function(){
layer.open({
title:'添加商品',
type:2, //表示通过url传入页面
area:['600px','400px'],
content:['${pageContext.request.contextPath}/items/addItems.action'],
skin:'layui-layer-lan',
btn:['添加','取消'],
yes: function(index,layero){
// 获取iframe中的form表单元素
var formSubmit=window.parent.document.getElementById('layui-layer-iframe1').contentWindow.document.getElementById("formSubmit");
// 提交form表单
formSubmit.submit();
layer.msg('操作成功',{
icon:1,
time:3000
});
// 提交表单后关闭弹出层窗口
layer.close();
// 刷新页面
location.reload();
}
})
});
//批量删除商品
$("#delete").on("click",function () {
// 因为必须传回一个item_id数组才能执行删除操作,所以要判断是否有复选框被选中
// 有复选框被选中时
if($("input[type='checkbox']").is(":checked")){
layer.alert('确定要删除吗',{
icon:3,
btn:['确定','取消'],
yes:function(){
// 修改form表单的提交路径
document.itemsForm.action="${pageContext.request.contextPath}/items/deleteItems.action";
document.itemsForm.submit();
layer.msg('删除成功',{icon:1});
}
});
}
// 若没有复选框被选中
else{
layer.msg('请至少勾选一个商品',{
icon:0,
time:3000
});
}
});
// 进入批量修改页面
$("#editQuery").on("click",function () {
document.itemsForm.action="${pageContext.request.contextPath}/items/editQueryItems.action";
document.itemsForm.submit();
})
})
</script>
</body>
</html>
4.运行结果
由于之前设置了设置了拦截器,在运行之前要先把springmvc.xml设置的拦截器注释掉
即注释掉这一部分1
2
3
4
5
6
7
8
9
10
11
12
13
14
15<!-- 配置全局拦截器 -->
<!--<mvc:interceptors>-->
<!--<!– 拦截器的执行顺序会按照配置的顺序执行 –>-->
<!--<!– 配置拦截器1 –>-->
<!--<mvc:interceptor>-->
<!--<!– 这里的“/**”表示所有url请求都进行拦截 –>-->
<!--<mvc:mapping path="/**"/>-->
<!--<bean class="controller.interceptor.HandlerInterceptorTest1"/>-->
<!--</mvc:interceptor>-->
<!--<!– 配置拦截器2 –>-->
<!--<mvc:interceptor>-->
<!--<mvc:mapping path="/**"/>-->
<!--<bean class="controller.interceptor.HandlerInterceptorTest2"/>-->
<!--</mvc:interceptor>-->
<!--</mvc:interceptors>-->
登录页面: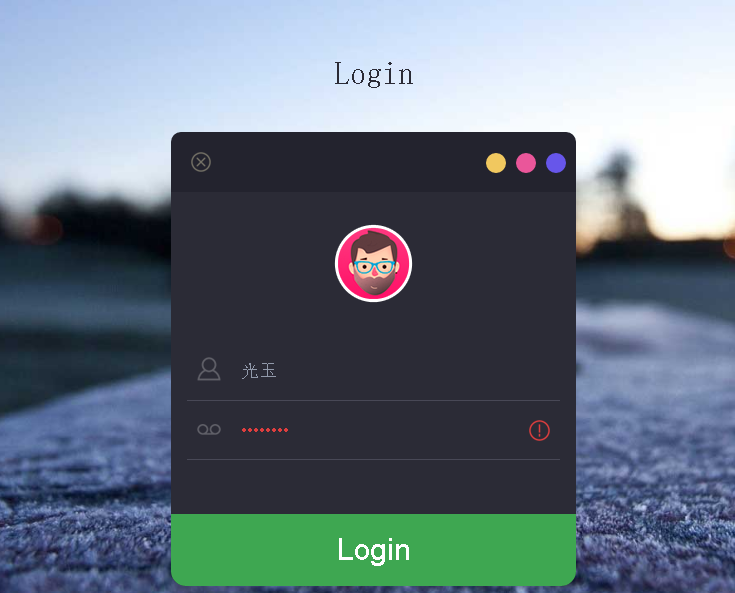
输入用户名后进行登录,用户名显示在右上角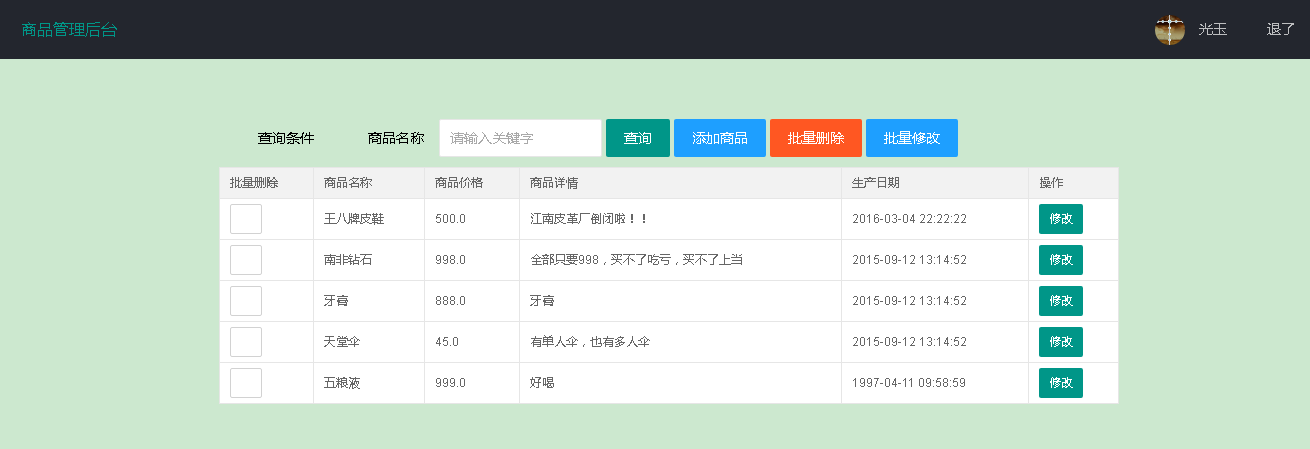
点击右上角的“退出”后,用户信息会被注销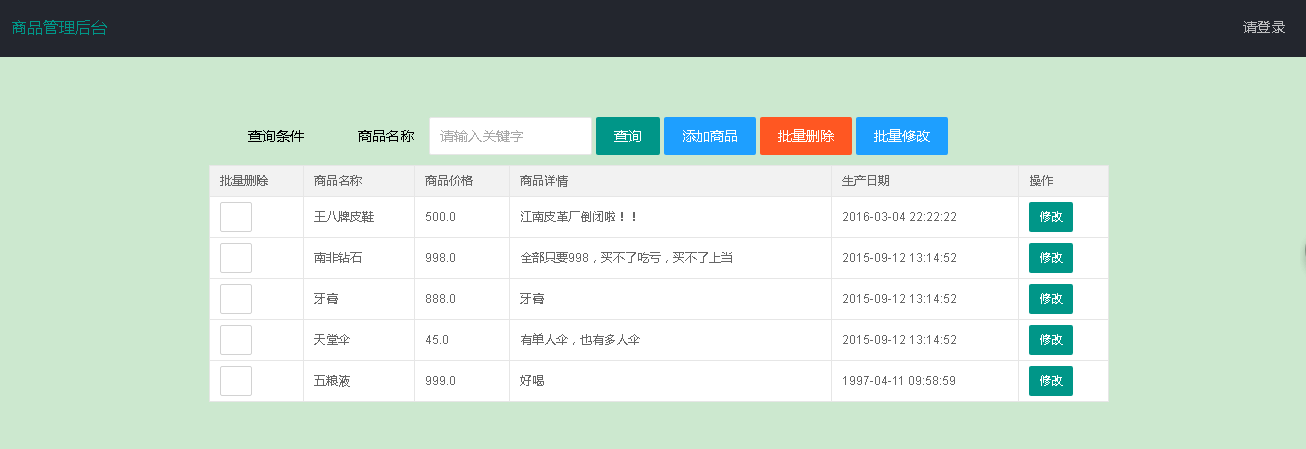
若需要项目源码,可以到我的github项目:ssm-highclass下载