Fork me on GitHub

SpringMVC配置及使用

前言

SpringMVC框架中主要主要有三大组件:处理器映射器,处理器适配器以及视图解析器
而映射器和适配器可以由非注解和注解两种方式进行配置
因为现在一般提倡注解方式配置,这里主要演示注解方式,非注解方式也会涉及一下

SpringMVC配置

首先,需要在网上下载spring jar包

1.需要导入的jar包

jar包

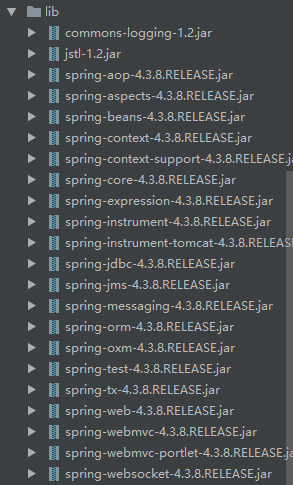
这里我偷懒了一下,可以只挑选出项目需要的几个jar包导入
项目的总体结构如下:
整体结构

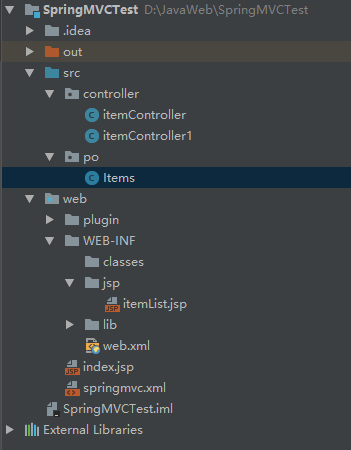
下面我们通过一个显示商品列表的小程序来进行相关的配置

2.前端控制器配置

编写WEB-INF目录下的web.xml

1
2
3
4
5
6
7
8
9
10
11
12
13
14
15
16
17
18
19
20
21
22
23
24
25
26
27
28
29
30
31
32
33
34
35
36
37
38
39
40
41
42

<?xml version="1.0" encoding="UTF-8"?>
<web-app xmlns="http://xmlns.jcp.org/xml/ns/javaee"
xmlns:xsi="http://www.w3.org/2001/XMLSchema-instance"
xsi:schemaLocation="http://xmlns.jcp.org/xml/ns/javaee http://xmlns.jcp.org/xml/ns/javaee/web-app_3_1.xsd"
version="3.1">

<!-- 前端控制器配置 -->
<!--
DispatcherServlet主要用作职责调度工作,本身主要用于控制流程,主要职责如下:
1、文件上传解析,如果请求类型是multipart将通过MultipartResolver进行文件上传解析;
2、通过HandlerMapping,将请求映射到处理器(返回一个HandlerExecutionChain,它包括一个处理器、多个HandlerInterceptor拦截器);
3、通过HandlerAdapter支持多种类型的处理器(HandlerExecutionChain中的处理器);
4、通过ViewResolver解析逻辑视图名到具体视图实现;
5、本地化解析;
6、渲染具体的视图等;
7、如果执行过程中遇到异常将交给HandlerExceptionResolver来解析。
-->
<servlet>
<servlet-name>springmvc</servlet-name>
<servlet-class>org.springframework.web.servlet.DispatcherServlet</servlet-class>
<!-- 加载springmvc配置文件 -->
<init-param>
<param-name>contextConfigLocation</param-name>
<!-- 配置文件的地址,如果不配置contextConfigLocation,
默认查找的配置文件名称是classpath下的:servlet名称+"-servlet.xml"即springmvc-servlet.xml-->
<param-value>springmvc.xml</param-value>
</init-param>
</servlet>

<!-- 映射 -->
<servlet-mapping>
<servlet-name>springmvc</servlet-name>
<!-- 可以配置/ 表示此工程所有请求全部由springmvc解析,此方式可以实现RESTful(表征性状态转移,总结起来应该是是一种简洁的架构风格)方式,
静态文件不能由springmvc解析,需要特殊处理
可以配置*.do或者*.action,所有请求的url扩展名为.do或.action由springmvc解析,此方法常用
不可以配置/* ,如果配置/* ,则返回的jsp也有springmvc解析,这是不对的 -->
<!-- 根据个人习惯配置配置.do或者.action后缀,这里配置的是.action -->
<url-pattern>*.action</url-pattern>
</servlet-mapping>

</web-app>

3.注解配置处理器映射器

之前在前端控制器中指定了配置文件是web目录下的springmvc.xml文件,这里需要来配置springmvc.xml
首先,引入相关的xml主题规范

1
2
3
4
5
6
7
8
9
10
11
12
13
14
15
16
17
<?xml version="1.0" encoding="UTF-8"?>
<beans xmlns="http://www.springframework.org/schema/beans"
xmlns:xsi="http://www.w3.org/2001/XMLSchema-instance" xmlns:mvc="http://www.springframework.org/schema/mvc"
xmlns:context="http://www.springframework.org/schema/context"
xmlns:aop="http://www.springframework.org/schema/aop" xmlns:tx="http://www.springframework.org/schema/tx"
xsi:schemaLocation="http://www.springframework.org/schema/beans
http://www.springframework.org/schema/beans/spring-beans.xsd
http://www.springframework.org/schema/mvc
http://www.springframework.org/schema/mvc/spring-mvc.xsd
http://www.springframework.org/schema/context
http://www.springframework.org/schema/context/spring-context.xsd
http://www.springframework.org/schema/aop
http://www.springframework.org/schema/aop/spring-aop.xsd
http://www.springframework.org/schema/tx
http://www.springframework.org/schema/tx/spring-tx.xsd ">

</beans>

这里没有指定xsd版本号,默认使用引入的spring jar包的最新版本
接下来,通过注解方式配置处理器映射器
在springmvc.xml中添加:

1
2
<!-- 注解方式配置处理器映射器 -->
<bean class="org.springframework.web.servlet.mvc.method.annotation.RequestMappingHandlerMapping"/>

RequestMappingHandlerMapping映射器需要在Handler中使用@org.springframework.stereotype.Controller来标识这个类是一个控制器,
并且需要使用@RequestMapping来指定url,使用方式会在编写后端控制器时给出

4.注解配置处理器适配器

在springmvc.xml中添加:

1
2
 <!-- 注解方式配置处理器适配器 -->
<bean class="org.springframework.web.servlet.mvc.method.annotation.RequestMappingHandlerAdapter"/>

RequestMappingHandlerAdapter适配器不要求Handler实现任何接口,需要和RequestMappingHandlerMapping配对使用

5.注解方式编写后端控制器

1
2
3
4
5
6
7
8
9
10
11
12
13
14
15
16
17
18
19
20
21
22
23
24
25
26
27
28
29
30
31
32
33
34
35
36
37
38
39
40
41
42
43
package controller;

import org.springframework.web.bind.annotation.RequestMapping;
import org.springframework.web.servlet.ModelAndView;
import po.Items;

import java.math.BigDecimal;
import java.util.ArrayList;
import java.util.Date;
import java.util.List;

//标识itemController1 为控制器
@org.springframework.stereotype.Controller
public class itemController1 {
//指定url,即结合web.xml中配置的*.action组成url(这里是/queryItems.action)
//即RequestMapping实现一个url对应一个方法名
//建议url和方法名取一样的名字,方便维护
//也可以写为/queryItems.action
@RequestMapping("/queryItems")
public ModelAndView queryItems(){

//使用静态数据将商品信息显示在jsp页面上
List<Items> itemsList=new ArrayList();
Items item1=new Items();
item1.setName("皮鞋");
item1.setPrice(new BigDecimal(500));
item1.setDetail("江南皮革厂倒闭啦!!!");
item1.setCreatetime(new Date());

Items item2=new Items();
item2.setName("台式笔记本");
item2.setPrice(new BigDecimal(4399));
item2.setDetail("吃鸡标配,i5配置");

itemsList.add(item1);
itemsList.add(item2);

ModelAndView modelAndView=new ModelAndView(); //创建视图对象
modelAndView.addObject("itemsList",itemsList);
modelAndView.setViewName("/WEB-INF/jsp/itemList.jsp"); //指定用户访问的jsp页面地址
return modelAndView;
}
}

这里使用了po包的Items包装类,可以通过之前所学的mybatis逆向工程生成,这里给出相应代码

1
2
3
4
5
6
7
8
9
10
11
12
13
14
15
16
17
18
19
20
21
22
23
24
25
26
27
28
29
30
31
32
33
34
35
36
37
38
39
40
41
42
43
44
45
46
47
48
49
50
51
52
53
54
55
56
57
58
59
60
61
62
63
64
package po;

import java.math.BigDecimal;
import java.util.Date;

public class Items {
private Integer id; //商品id

private String name; //商品名称

private BigDecimal price; //商品价格

private String detail; //商品详情

private String pic; //商品图片

private Date createtime; //生产日期

public Integer getId() { return id; }

public void setId(Integer id) {
this.id = id;
}

public String getName() {
return name;
}

public void setName(String name) {
this.name = name == null ? null : name.trim();
}

public BigDecimal getPrice() {
return price;
}

public void setPrice(BigDecimal price) {
this.price = price;
}

public String getDetail() {
return detail;
}

public void setDetail(String detail) {
this.detail = detail == null ? null : detail.trim();
}

public String getPic() {
return pic;
}

public void setPic(String pic) {
this.pic = pic == null ? null : pic.trim();
}

public Date getCreatetime() {
return createtime;
}

public void setCreatetime(Date createtime) {
this.createtime = createtime;
}
}

itemController1控制器还指定“/WEB-INF/jsp/itemList.jsp”,这里给出itemList.jsp的相关代码

1
2
3
4
5
6
7
8
9
10
11
12
13
14
15
16
17
18
19
20
21
22
23
24
25
26
27
28
29
30
31
32
33
34
35
36
37
38
39
40
41
42
43
44
45
46
47
48
49
50
51
52
53
54
55
56
57
58
59
60
61
62
63
64
65
66

<%--
Created by IntelliJ IDEA.
User: 光玉
Date: 2018/4/3
Time: 18:35
To change this template use File | Settings | File Templates.
--%>
<%@ page contentType="text/html;charset=UTF-8" language="java" pageEncoding="UTF-8" %>
<%@ taglib prefix="c" uri="http://java.sun.com/jsp/jstl/core" %>
<%@ taglib prefix="fmt" uri="http://java.sun.com/jsp/jstl/fmt" %>

<!DOCTYPE html>
<head>
<title>查询商品列表</title>
<meta http-equiv="Content-Type" content="text/html; charset=UTF-8">
<script type="text/javascript" src="<%= request.getContextPath()%>/plugin/layui/layui.all.js"></script>
<link rel="stylesheet" href="<%= request.getContextPath()%>/plugin/layui/css/layui.css">
</head>
<body>
<form class="layui-form" action="${pageContext.request.contextPath}/queryItems.action" method="post">
<div class="layui-input-block">
<label class="layui-form-label">查询条件</label>
<button class="layui-btn" type="submit" value="查询">查询</button>
</div>
<table class="layui-table" lay-size="sm">
<colgroup>
<col width="150">
<col width="150">
<col width="150">
<col width="150">
<col width="150">
</colgroup>
<thead>
<tr>
<th>商品名称</th>
<th>商品价格</th>
<th>商品详情</th>
<th>生产日期</th>
<th>操作</th>
</tr>
</thead>
<tbody>
<c:forEach items="${itemsList}" var="item">
<tr>
<td>${item.name}</td>
<td>${item.price}</td>
<td>${item.detail}</td>
<%-- 注意:pattern里的日期格式大小写要写正确 --%>
<td><fmt:formatDate value="${item.createtime}" pattern="yyyy-MM-dd HH:mm:ss"/> </td>

<td><a href="${pageContext.request.contextPath}/items/editItems.action?id=${item.id}">修改</a></td>
</tr>
</c:forEach>
</tbody>
</table>
</form>

<script>
layui.use('form', function () {
var form = layui.form;
form.render('radio');
});
</script>
</body>
</html>

注意,jsp文件中使用了layui前端插件,路径是web/plugin/layui,如有需要请到layui官网下载,
否则就不引入插件,使用原来的html标签编写

然后我们需要在springmvc.xml中对该Handler进行配置

1
2
3
4

<!-- 配置单个注解的Handler
不需要声明id和name属性,只需要给出class="包名.类名"即可 -->
<bean class="controller.itemController1"/>

上面的配置方式是配置单个Handler,若要对多个Handler进行配置,可以使用以下的方式

1
2
3
4

<!-- 使用扫描器进行扫描
对controller包下的所有处理器进行扫描-->
<context:component-scan base-package="controller"/>

6.配置视图解析器

Handler执行完成后给处理器适配器返回一个ModelAndView对象,它是Spring MVC的一个对象,用于
对Model和View进行封装。然后处理器适配器又将这个对象返回给DispatcherServlet,DispatcherServlet
调用视图解析器进行视图解析,所以这里我们要配置视图解析器,在springmvc.xml中添加如下内容:

1
2
3
4

<!-- 使用扫描器进行扫描
对controller包下的所有处理器进行扫描-->
<context:component-scan base-package="controller"/>

7.运行项目实例

部署好Tomcat之后,在浏览器中输入http://localhost:8080/SpringMVC/queryItems.action,可以看到商品列表
list

优化:可以代替注解映射器和适配器的方式

可以使用以下方式进行优化

1
2
3
4
5
6
	
<!-- 使用下面这种方式可以代替上面的注解映射器和适配器
并且默认加载很多参数,如:json解析转换解析器,
使用了这种配置方式之后就不用再配置上面的注解映射器和适配器
实际开发中更多使用mvc:annotation-driven -->
<mvc:annotation-driven></mvc:annotation-driven>

即使用上面的配置方式后,可以不用再配置上面的注解映射器和适配器,其他步骤不变

附:非注解方式配置处理器映射器和适配器

前面几个步骤一样,到配置处理器映射器和处理器适配器时需要换成非注解方式
这里只是介绍了其中一种,要了解更多请上网搜索相关内容

1.配置非注解处理器映射器

1
2
3
4
5

<!--配置处理器映射器(非注解方式)
springmvc框架根据HandlerMapping接口判断是否是处理器映射器 -->
<!-- 根据bean 的name查找Handler,将action的url配置在bean的name中 -->
<bean class="org.springframework.web.servlet.handler.BeanNameUrlHandlerMapping"/>

2.配置非注解处理器适配器

1
2
3
4

<!--配置处理器适配器 (非注解方式)(这里配置的是简单控制器处理适配器)
springmvc框架根据HandlerAdapter接口判断是否是处理器适配器 -->
<bean class="org.springframework.web.servlet.mvc.SimpleServletHandlerAdapter"/>

3.编写后端控制器

1
2
3
4
5
6
7
8
9
10
11
12
13
14
15
16
17
18
19
20
21
22
23
24
25
26
27
28
29
30
31
32
33
34
35
36
37
38
39

package controller;
import po.Items;

import org.springframework.web.servlet.ModelAndView;
import org.springframework.web.servlet.mvc.Controller;

import javax.servlet.http.HttpServletRequest;
import javax.servlet.http.HttpServletResponse;
import java.math.BigDecimal;
import java.util.List;
import java.util.ArrayList;
import java.util.Date;

//这里需要继承Controller接口
public class itemController implements Controller{
@Override
public ModelAndView handleRequest(HttpServletRequest httpServletRequest, HttpServletResponse httpServletResponse) throws Exception{
List<Items> itemsList=new ArrayList();
Items item1=new Items();
item1.setName("皮鞋");
item1.setPrice(new BigDecimal(500));
item1.setDetail("江南皮革厂倒闭啦!!!");
item1.setCreatetime(new Date());

Items item2=new Items();
item2.setName("台式笔记本");
item2.setPrice(new BigDecimal(4399));
item2.setDetail("吃鸡标配,i5配置");

itemsList.add(item1);
itemsList.add(item2);

ModelAndView modelAndView=new ModelAndView();
modelAndView.addObject("itemsList",itemsList);
modelAndView.setViewName("/WEB-INF/jsp/itemList.jsp");//指定用户访问的jsp页面地址
return modelAndView;
}
}

Iems类和itemList.jsp还是使用原来的文件,不需要改变

4.配置后端控制器

1
2
3
4

<!-- 配置后端控制器 -->
<!-- 由于使用的处理器映射器是BeanNameUrlHandlerMapping,需要给bean 的name配置url -->
<bean name="/queryItems.action" class="controller.itemController"/>

5.配置视图解析器

还是使用原来的视图解析器,然后部署Tomcat,输入http://localhost:8080/SpringMVC/queryItems.action运行项目实例

补充

配置视图解析器时,可以指定jsp路径的前缀和后缀

1
2
3
4
5
6
7
8
9

<!--配置视图解析器
解析jsp页面,默认使用jstl标签,所以要求将jstl的包加到classpath-->
<bean class="org.springframework.web.servlet.view.InternalResourceViewResolver">
<!-- 配置jsp前缀 -->
<property name="prefix" value="/WEB-INF/jsp/"/>
<!-- 配置jsp后缀 -->
<property name="suffix" value=".jsp"/>
</bean>

相应的控制类中(这里是改itemController1类中的modelAndView.setViewName语句)
modelAndView.setViewName("/WEB-INF/jsp/itemList.jsp"); //指定用户访问的jsp页面地址
改成
modelAndView.setViewName("itemList"); //指定用户访问的jsp页面地址,前缀和后缀已在前端控制器中配好

总结

  • 前端控制器url-pattern有两种配置方式,即 *.do或 *.action 以及 /
  • 使用注解映射器时,要用@Controller标识控制类,用@RequestMapping定义url
  • 注解适配器要和注解映射器成对使用,不能一个是非注解的,一个是注解的
  • 视图解析器默认不配置参数,那么就要在modelAndView.setViewName中写出完整的jsp路径;
    也可以配置路径的前缀和后缀这两个参数,在modelAndView.setViewName中就不需要再写前缀和后缀了